Fathers Day Word Scrapbook
"Great fathers day scrapbook gift idea"
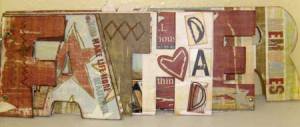
I have created so many scrapbooks of my family and in those I would say about 98% of the photos are of my two boys. My husband might show up once per album and I might show up once. And I realized that there will be a point in our lives (or after our lives are done) that people are going to want to see photos of us and want to know us. My husband is a terrific father, a loving husband, and an overall really fun and amazing guy. I wanted to honor him with his own mini book this year and he loved it!
Supplies needed:
-
SEI Father word album
-
A collection of papers from the “Papa” line from Fancy Pants Designs, including the Papa Cards paper
-
“Papa” rub-ons by Fancy Pants Designs
-
About a yard of twill ribbon
-
ecru colored embroidery floss
-
needle with large eye
-
adhesive (I always use Fabri-Tac by Beacon for my projects)
-
paper trimmer
-
scissors
-
three small red buttons
-
off-white colored thread
-
scalloped oval, scalloped square punches (or decorative scissors with scallop)
-
heart punch
-
stapler with silver (regular) staples
-
two small silver brads
-
paper piercer
-
Heidi Swapp corner stamp “Happy, enjoy, smile…”
-
Dark Brown cat’s eye fluid chalk ink pad by Colorbok
-
Hole punch or Crop-A-Dile
-
Black journaling pen
How to begin:
First of all, select roughly 14 of your favorite photos of Dad and those who love him.
Take the Father word album apart and separate the pages.
I started from the back of the album and moved forward, the reason for this is that I am using the biggest pieces (of the papers) first and then I used my leftovers to cover the smaller remaining letters.
Back of R:
Find the paper with large dark brown diamonds. Cut to 4” by 12” (the album is 4” tall), then trace and cut the back of the R and use the paper to cover the back piece. You will have a small section by the rings that is not covered. You will add a 1”x4” strip of the red paper to that section. Use the heart rub-on and sign the book. Punch your holes for the rings.
Front of the R:
Select the striped piece of paper and cut to 4”x12”. Trace and cut to fit the front of the R. You will need to use a 2”x4” piece of red to finish the area by the rings. Do not glue down. Next select three photos and position them as shown. Glue the photos down. From the Papa paper with strips of quotes, cut out “He Didn’t tell me how to live…” cut in half as shown and place down. Glue. Now use your paper piercer to pierce holes to form arrows as shown. Use a back stitch and the ecru embroidery floss to finish the arrows. Now you can glue the pieces to the R. Finish with the Memories rub-on. Punch your holes for the rings.
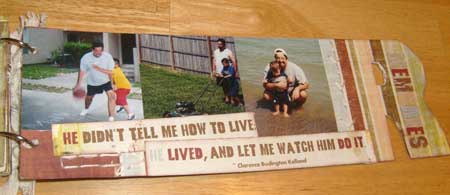
Fathers Day Scrapbook - R
Back of E:
You will use the large brown diamond paper to cover the back of the E so trace and cut. Go ahead and glue it down. Next find the paper with small lighter brown diamonds (light blue on back) and cut a 7”x7” piece. Fold in half. This will flip up on this page. Place strips of the twill ribbon as shown. Cut a small tag (write “We [heart] Dad”) and glue down over the ribbon. Matte your photos with brown cardstock and glue down as shown. I used the Heidi Swapp corner stamp on the light blue Papa paper for the bottom corner accent, but I’m sure any stamp you have will work nicely. For the top of the inside of the flap, I used a portion of the Papa cards that reads “True strength is delicate” and used a scalloped square punch (you could use decorative scissors). I placed a baby photo next to it and finished with the rub-ons. For the top of the flap, cut a piece of the light brown small diamond paper to fit. Do not glue it down yet. Go ahead and glue down photos. Then use your paper piercer to pierce holes of the star and scroll. Use a back stitch and ecru colored embroidery floss to complete those accents and glue down. Finish the back of the E with the heart rub-ons. Punch your holes for the rings.
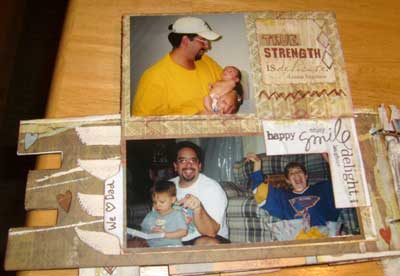
Fathers Day Scrapbook - E
Front of E:
Use a piece of the red paper, trace and cut to fit the front of the E. Attach the brads as shown, then glue that piece down. Glue strips of twill ribbon as shown. Then cut (from the Papa cards) “All Serious daring…”. Use your paper piercer and embroidery floss to stitch an arrow. Then glue that piece and the photo down. Place the star rub-on at the bottom of the E. Punch your holes for the rings.
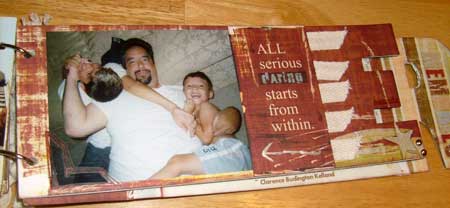
Fathers Day Scrapbook - E
Back of the H:
Select the paper with a light blue background and stars. Trace and cut to fit the back of the H. Glue your photo to the right side. Find the Papa cards piece that says “Adventure” and cut and position as shown. Glue those down. Now add the twill and staple as shown. Next cut a piece of scrap paper and apply the rub-on “The bumps…” glue this piece down. Next apply the three red diamond rub-ons. In the center of each, sew a button. Now you can glue the entire piece to the H and then punch your holes for rings.
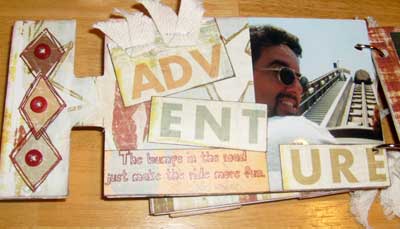
Fathers Day Scrapbook - H
Front of the H:
Find the paper that is light in color and trace and cut to fit the front of the H. Go ahead and glue it down. Cut the letters “DAD” from the Papa alphabet paper. Use pop dots or foam adhesive to apply the two D’s to give them some dimension. Glue down the A. Next punch a heart from a scrap piece of red paper (from one of the Papa papers). Use your paper piercer and embroidery floss to create a heart accent on the punched heart. Glue down. Cut a piece of one of the Papa papers to the shape of an “I”. Glue down. Now glue down a photo. Then I took the Papa cards piece that reads “May you live…” and cut it out with a scalloped oval punch (you can use decorative scissors). Glue down. Punch holes for the rings.
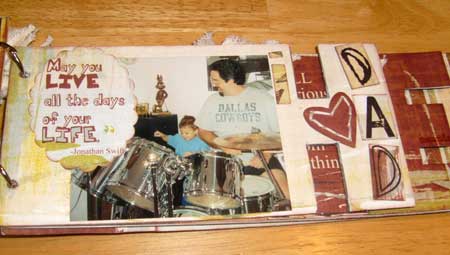
Fathers Day Scrapbook - H
Back of the T:
Select the striped paper and cut to fit the back of the T. Do not glue down to the T yet. Glue your photo down. Apply the “fun times”, heart, “life”, and photo corner rub-ons. Cut out the “the details” and the “the date” pieces from the Papa cards and glue down. Journal the information for both. Next use your paper piercer and embroidery floss to create the arrow as shown. Glue the entire piece to the back of the T and punch holes for the rings.
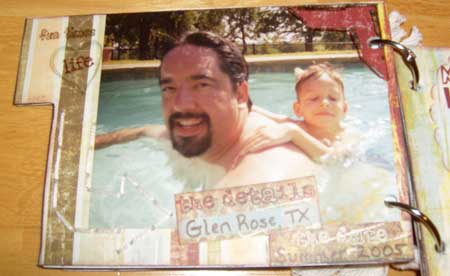
Front of the T:
Select the dark brown large diamond paper and trace and cut to fit. Do not glue yet. Matte your photo on lighter paper and glue down. Then cut a piece of the lighter brown small diamond paper and place as shown. Be really careful with this part because you want the light brown paper strip to be hidden by the A so line it up carefully. Glue down. Now Stamp Dad’s name on that strip. Add the diamond rub-ons to the right as shown. With your paper piercer and embroidery floss create the scroll as shown. Glue the entire piece to the front of the T and punch your holes for the rings.
Back of the A:
Select a piece of the red Papa paper and trace and cut to fit the back of the A. Matte your photo to fit to the right side of the A and glue the photo and matte down. Next create a tag and punch a small hole. Use embroidery floss as a tiny accent to the top of the tag. Glue that down. Now use your paper piercer and embroidery floss to create a star on the left side of the A. Glue the entire piece to the A and punch holes for your rings.
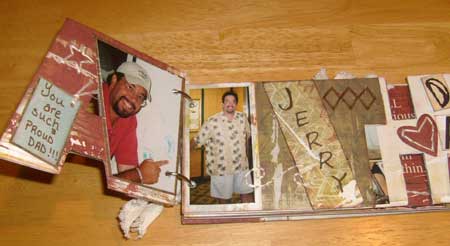
Fathers Day Scrapbook - A
Front of A:
Trace, cut and glue down the light blue paper with stars to the front of the A. Matte a photo and glue down as shown. Finish with the rub-on “You make life…”. Punch holes for rings.
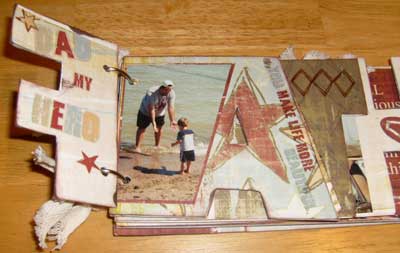
Fathers Day Scrapbook - F
Back of F:
Cut a piece of the lighter colored paper to fit and glue down. Apply the star rub-ons and the “Dad my hero” rub-ons. Punch holes for rings.
Front of F:
Use the red Papa paper for the front of the F. Trace, cut and glue down. Apply zig zag rub-ons and punch holes for rings.
Finish the book by adding the rings and tying several pieces of twill ribbon to the rings.
Congratulations you’ve finished an adorable mini book and have a way to showcase your favorite photos of Dad!
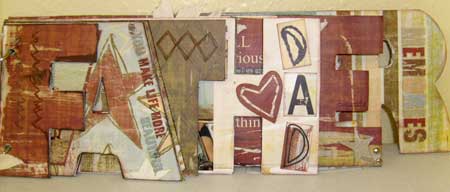
Fathers Day Scrapbook - The whole shebang,
Hot Tips:
-
Make sure you punch the hole for your ring after each page. If you forget and cover both sides with paper, you won’t know where to punch the hole!
-
When you are adding adhesive, make sure you spread it all the way to the edges so the paper won’t peel up with use.
-
If you want a really nice edge, cut the paper to fit the album page but leave about ¼” all the way around. Glue down, spreading the glue to the edge of the album page. Then use a nail file to file down (not up and down) the edges. The paper will break off and you’ll have a nice crisp edge!
-
I used the dark brown fluid chalk to edge each photo matte, page edge, and tag piece. It really adds to the rugged, masculine look of the book.
-
Be creative and adjust these instructions as you need to accommodate your photos.
Amy Smith
Corpus Christi, TX

