Easy one page accordion album
 Make
this simple accordion album from one sheet of 12"x12" cardstock. We will
turn one sheet of cardstock into a cute handmade mini album in a matter of
minutes. When it is completed the final mini album will be have 6 inner pages
(or 10 pages if you use the reverse side of the accordion book) It will measure
4"x4" without covers and approx 4.5" with the front and back cover.
I have found that these little mini albums are great for getting rid of my scrap pieces of patterned paper left over from making my larger 6x6 mini books. They are also great to add to the inner pages of my other mini albums to hold extra photos or to hide my journaling. Try sticking one to your 12"x12" layouts as well for a neat touch.
Gift Idea
Because they are so quick and easy to make you can make a few albums to give away as Christmas presents - 6 pages is great for a few family pictures taken over the year. Maybe you can make 6 or so birth announcement card albums for your closest friends and family with pictures and birth information of the newest addition to your family.
Check out this
accordion
album example of in the mini album gallery.
Accordion Album Instructions
Supplies:
- 1 12"x12" piece of cardstock
- paper trimmer
- adhesive - tape or glue
- scoring tool and bone folder (optional)
|
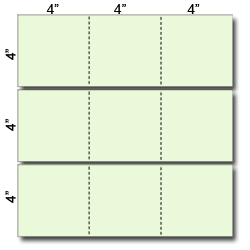
1. Take one Sheet of 12" x 12" cardstock and trim it into three 4" x 12" strips. 2. Take one of the strips and score two folds, one at 4" and one a 8" 3. Repeat step two for the remaining two strips
4. Trim the third strip so that it measures 4"x8" this strip will act as a hinge to keep the album together.
|
|
|
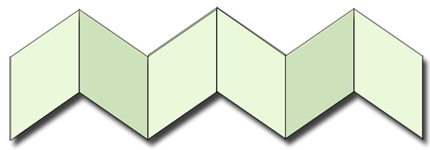
| 5. Fold the three pieces concertina style as in the picture above. |
|
|
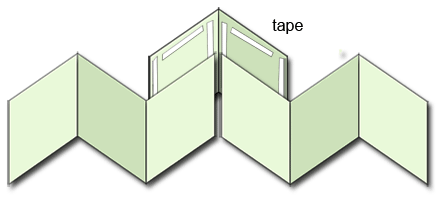
| 6. To put the album together simply place the two longer strips side by side, apply double sided tape to the hinge and |
|
|
| The end result is a 4"x4" concertina album which can fit nicely into your hand bag. Embellish your mini albumEembellish and decorate your accordion album as you like. Cover your albumCovers can be made for your album by cutting two 4.25"x4.25" square pieces from chipboard or stiff cardboard and covering with co-ordinating papers. Adhere the covers to the front and back page of your album centring each page within the covers. Before you stick the back cover on attach a length of 14" ribbon to the inside of the back cover. This will form a neat ribbon tie closure. TipsWhen taping the the back piece (the hinge) do not apply tape to the topside of the album. This will create two pockets for you to slip a couple of tags into. |


